Showing posts with label Montrose Project. Show all posts

Thursday, March 2, 2017

Kitchen Update- Montrose Project

I cannot believe it’s Thursday already!!! We had family in town at the beginning of the week so I feel like I’m just now hitting my stride with work. It’s been a busy week- furniture was delivered for a living room and master bedroom design, I presented initial kitchen drawings to a client and will be meeting with them again next week with tile and countertop selections, and I have a walk-through appointment for cabinetry on a new build tomorrow morning. Add in a couple of out-of-state projects, a new spec home I’m assisting with, the Montrose project and a few other smaller designs and my days get filled up quickly. With that being said, I could not be luckier to work with/for such great contractors and clients! 

I promise to share more details on all of these projects in the next few weeks, but today I want to show you the updates happening in the kitchen in my Montrose project. Last time I shared the new island and the design plan for countertops, backsplash, paint color, and the fireplace tile. Well, it's all been installed and it's looking great! If you remember, this island is massive and required a seam for the stone counters. Fortunately, I work with a great fabricator who did a fabulous job matching the seams beautifully. I really love the movement of the stone and even the bits of burgundy that play off the accent pillows on my client’s new sectional. The island painted the dark gray is a nice contrast to the white perimeter cabinetry and coordinates nicely with the granite. 
Modern kitchen renovation- Wild Rose Interiors
Homeowner wanted a larger fridge,
so my carpenter built a new surround to fit it.


Modern kitchen renovation- Wild Rose Interiors
Countertop + Backsplash Demo

Modern kitchen renovation- Wild Rose Interiors
Lots of storage in the new island


Modern kitchen renovation- Wild Rose Interiors
Level surface is a must

Modern kitchen renovation- Wild Rose Interiors
All hands + paws on deck

Modern kitchen renovation- Wild Rose Interiors
Fitting the new cooktop in

Modern kitchen renovation- Wild Rose Interiors
Had to cut way for the new larger sink


Taller, industrial faucet to balance out the window

Enough space for seating on three sides


Modern kitchen renovation- Wild Rose Interiors
A little before and after on the island itself

Modern kitchen renovation- Wild Rose Interiors
Close up on one of the slabs

Modern kitchen renovation- Wild Rose Interiors
A quick sneak peak of the backsplash

The fireplace wall has also undergone quite a transformation from small and traditional to sleek and modern. Taking the fireplace tile to the ceiling really emphasized the height of the ceilings and feels for more proportionate to the scale of the room. We also removed the traditional built-in shelves for thicker, floating shelves. We were able to save the lower cabinets and painted them the same dark gray as the island. We added white + silver metallic grass cloth to the back of the bookcase for added texture, which we also used on a blank wall in the kitchen, tying the two spaces together nicely.
Can't wait to style out those shelves!

Cleaner and better scale
That's all I have for today. Next week I'm sharing a custom, modern farmhouse I'm helping to design. The house is still in the construction phase, but I have lots to catch you up on. Have a great weekend!! 

Monday, February 20, 2017

Kitchen Progress- Montrose Project

It officially took me a whole four weeks into the new year to fail at my resolution/goal of posting one blog each week!!! Seriously, where has the month of February gone?!? I have a lot of exciting projects going on right now that I can’t wait to start sharing with you, but today I’m going to revisit the our project on Morse Street that I shared last time. The plan is to add a contemporary edge to this more traditional home, starting in the kitchen.

From the start of this project, my client’s number one request was to extend the island out larger. Since we were planning to replace the countertops, we thought we would add legs and extend the countertop out, but after looking at the storage provided by the island (only two utensil drawers and a single cabinet below each), we decided that rather than trying to retrofit the existing island it would be better to design a new one that provided ample storage. We made the island almost twice the size of the original and then added five large drawers on one side and three drawers and one larger cabinet with a deep pullout on the other. The side where the gas cooktop will be located has two utensil drawers on either side. We lost the cabinets below these drawers to allow for the larger drawers on the side which function better. We then added legs out beyond the base of the island to allow for barstools to be pulled up on three sides. While this island is massive, it still feels proportionate to the space and provides the entertaining space the homeowner desired. 
Custom island 

Painters busy working on the ceilings
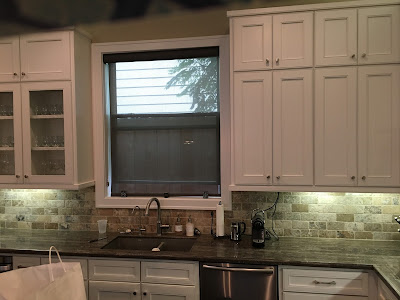
The island will be painted dark gray to add some contrast to the white cabinets on the perimeter of the kitchen. While the original dark brown marble counters and tumbled travertine backsplash were not bad choices, they did not fit the light, bright clean lines my client was wanting. The countertops will be replaced with a white based granite with various shades of gray and little touches of maroon. To compliment the dark gray island, I selected a charcoal gray, beveled glass subway tile, which bounces the light around the room. The homeowner wanted a large, single basin sink and a more modern faucet. We went with a stainless steel farmhouse-style sink and a tall, industrial faucet. 
Backsplash demo!!! Original countertops + sink/faucet
Granite slab--love the movement on the stone
Modern kitchen renovation- Wild Rose Interiors
Backsplash compliments the granite beautifully
Island color

The fireplace in the connected family room is also getting a makeover. The original fireplace mantle did not feel proportionate to the size of the room and the ceiling height so we knew that needed to be addressed right away. The plan is to remove the mantle and tile the entire center portion of the fireplace with a modern gray tile. Code requires a non-combustible material in front of a gas or wood-burning fireplace, so we will use a dark slate tile on the floor so there is little contrast against the dark hardwood floors in the room. The built-ins also felt far too traditional so we decided to keep the base cabinets and replace the upper portion with floating shelves for a cleaner look. The base cabinets will be painted the same dark gray as the island and the floating shelves will be stained a lighter gray. 
12x24" tile for fireplace wall-- great texture and shimmer 
Classic gray stain for the floating shelves
Slate for the floor in front of the fireplace

That's all I have for today. Next time I will be sharing the kitchen with the replaced countertops and installed backsplash. It’s such a transformation from the original design. And wait until you see all the fabulous wallpaper that we are using in this home- it will knock your socks off! In the coming weeks I’ll also be introducing a few new projects I have working right now as well. So many good things- can’t wait to get you all up to speed! 

Monday, January 16, 2017

Traditional to Modern- Montrose Project

I cannot believe January is already half way over!! Ryan always jokes that it will be Christmas again before we know it and I think he might be right! For the past few months I have been busy working on several projects, all of which are still in process, but I’m finally taking the time to sit down and share the plans + progress.

First on the list is this great house in the Montrose area in Houston. It’s 4200 square feet, 4 bedrooms and 3.5 baths. The house was beautiful when it was purchased but very traditional and my bachelor client was looking for more of a modern, entertaining home. Focusing primarily on the first floor, office and master bedroom our list of things to accomplish included the following:

-Paint all walls (house was a generic shade of tan throughout)
-Strip + stain the light oaks floors
-Replace traditional light fixtures
-Extend island to accommodate more seating
-New countertop + backsplash in the kitchen
-Modernize fireplace wall
-Add wallpaper to various rooms
-Transform elevator closet into wine room
-New furniture

While we’ve managed to check quite a few things off this list, we’re still working on all the finishing details. The house has transformed looks so much and I cannot wait to share more of the progress with you in the coming weeks. In the meantime, here are a few of the before pictures I snapped quickly long before I knew I was going to be writing a blog (Read- excuse the crappy photos with stuff everywhere in them because I didn't know I'd be sharing these before photos)! :) *Side note- the floors were stained darker by the time I took these photos. 

Wild Rose Interiors
New island will be almost double in size to this one.


Wild Rose Interiors
Replacing the sink with a large stainless, farmhouse style one with an industrial faucet.

Counters are too dark + the backsplash is too traditional 

Very traditional fireplace wall that will be simplified and tiled. 

This table is being moved to the kitchen area and this will become a lounge area.
The wine room is being built to the right of this space. 

Office space on second floor

Master bedroom with stripped floors

Later this we're taking a trip to dark side and sharing our favorite charcoal + navy colors to use in homes!